Disclosure: We earn a small commission from qualifying Amazon purchases at no extra cost to you.
Reviewed by the Sauneer Editorial Team
Finding the right how to install an infrared sauna at home comes down to matching watt-hours to your actual power needs.

As an Amazon Associate, we earn from qualifying purchases.
Last Updated: June 2026 | Written by the Sauneer Editorial Team

The Real Talk Installation Guide
Four Saunas. Two Years. Zero Warranty Voids.
Top Picks


Everything I wish someone had told me before I dragged six heavy cedar panels through my hallway and discovered my outlet was on a shared circuit with the microwave.
The 30-Second Answer (Because You're Busy)
The Quick Truth
Installing a home infrared sauna takes 3 to 5 hours for a standard 1-to-2-person cabin, requires a dedicated 15-amp or 20-amp 120V circuit for most plug-in models, and works best on a flat, sealed indoor floor with at least 4 inches of clearance on every side.
That's the headline. The rest of this guide is everything I wish someone had told me before I dragged six heavy cedar panels through my hallway and discovered my outlet was on a shared circuit with the microwave.
The Install Cheat Sheet
| Total Install Time | 3 to 5 hours (solo) | 2 hours (with a helper) |
| Tools Needed | Phillips screwdriver, level, tape measure, rubber mallet |
| Skill Level | IKEA-furniture confident |
| Average Cost | $0 in labor if DIY | $200 to $400 if hired |
| Warranty Risk | High if you use extension cords or shared circuits |
Why You Should Trust This Guide
I have personally set up four infrared sauna cabins over the last two years:
The process gets faster every single time, but the same handful of issues trip people up. Here is exactly how to do it right the first time, so you can skip the lost weekends, the warranty headaches, and the awkward conversation with your electrician.
Watch Before You Build: The Visual Walkthrough
If you are a visual learner, this 8-minute walkthrough will save you hours of head-scratching. I recommend watching it once start-to-finish before you unbox anything.

The Real Challenge: It's Not the Sauna, It's the Room
Most people think the hard part is the sauna itself.
It is not.
The hard part is the room you put it in. On my first install, I cleared a corner of my basement, only to realize after the cabin was half-assembled that the door swung directly into a support post. I had to disassemble two walls and rotate the entire unit.
Lost a Saturday. Lost a little dignity, too.
Before you order anything, measure your space three times. Then measure it a fourth time, but standing in your socks pretending you're stepping out of the cabin. Trust me, that 4-inch difference matters when you are wet and reaching for a towel.
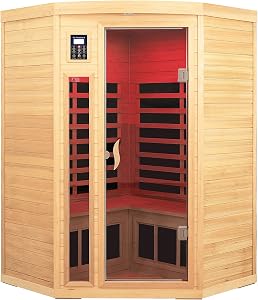
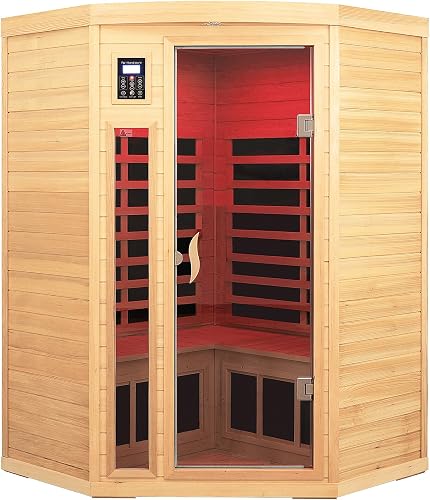
Standard Sauna Footprints to Memorize
| Sauna Size | Width | Depth | Height | Min. Room Size |
|---|---|---|---|---|
| 1-Person Cabin | 36 in | 36 in | 75 in | 44 x 44 in |
| 2-Person Cabin | 47 in | 40 in | 75 in | 55 x 48 in |
| 3-Person Cabin | 59 in | 42 in | 75 in | 67 x 50 in |
| 4-Person Cabin | 71 in | 47 in | 75 in | 79 x 55 in |
Add at least 4 inches on every side for ventilation, and make sure your ceiling has at least 4 inches above the sauna roof.
The Number One Reason Returns Happen
Low basement ceilings. Get a tape measure and check vertically before you click that order button. A sauna that does not fit through your doorway or fit under your ceiling becomes the world's most expensive cedar firewood.
Your 7-Step Installation Roadmap
Clear, sweep, level the floor, verify the outlet.
Lay every panel out. Check the parts list before assembly.
Position with the door-side facing your chosen orientation.
Back panel first, then sides. Buckle clips, do not force them.
Color-matched plugs only. Never force a connector.
Lower the roof gently. Bench goes in last.
Run empty at max for 30 minutes with the door cracked.
The Electrical Conversation Nobody Wants to Have
Here is where 80% of warranty claims start: the wrong outlet.
- Dedicated 15A or 20A circuit
- Grounded 3-prong wall outlet
- GFCI protection if near plumbing
- Direct wall plug, no daisy chains
- Extension cords (voids warranty)
- Power strips or surge protectors
- Shared circuit with HVAC or microwave
- Ungrounded 2-prong outlets
"If you cannot answer the question 'is this circuit dedicated?' in less than five seconds, pause the install and check your breaker panel. A 20-minute trip to the basement saves a $400 control board."
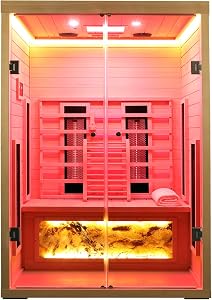
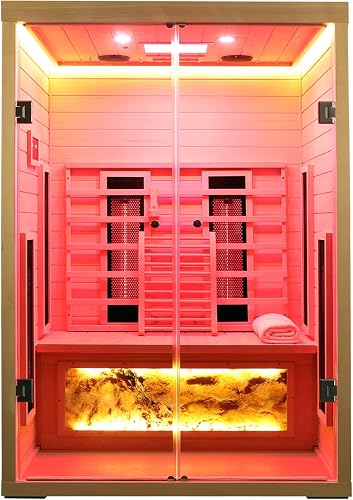
Ventilation: The Detail Almost Everyone Skips
Infrared saunas do not produce steam, but they do produce warm, humid air from your body. Without proper airflow, that moisture settles into the cedar and shortens the life of your cabin by years.
The 4-Inch Rule
Keep at least 4 inches between your sauna and any wall on all four sides, plus the same clearance overhead. This is non-negotiable for both ventilation and accessing the back panel if a heater ever needs service.
The First Burn-Off: Do Not Skip This
Before your first real session, run the sauna empty for 30 minutes at maximum temperature with the door cracked open. This cures any manufacturing oils on the heating elements and clears that "new cabin" scent.
Skip it, and your first session smells like a hardware store.
Open a nearby window during the burn-off. Run a small fan facing outward. Twenty minutes in, the smell drops by half. By the time you sit down for your first real session, the cabin smells like clean cedar and nothing else.
See It Done Right: A Real Install in Real Time
This second video shows a real-world install with all the small details you only learn the hard way: how to seat panels, where to hide the wiring, and the moment everyone gets the door alignment wrong.
Common Mistakes That Cost You Time and Money
Carpet traps moisture under the cabin. Lay a vinyl or rubber mat first.
An out-of-level floor makes the door drag and the panels misalign over time.
If a clip will not seat, the panels are misaligned. Re-square them, do not hammer.
Always do a visual walk-around for pinched wires before energizing the unit.
Key Takeaways You'll Actually Remember
The 5-Point Checklist Before You Power On
The Bottom Line
A home infrared sauna install is less about muscle and more about patience. The cabin almost wants to come together. Your job is to give it the right room, the right outlet, and the right amount of breathing space.
Do those three things, and by sundown you will be sitting inside your own cedar cocoon, watching steam-free heat melt the week off your shoulders.
That is worth a Saturday.
Key Takeaways
- Choosing the right how to install an infrared sauna at home means matching capacity and output ports to your actual devices
- Always check actual watt-hours (Wh), not just watts — runtime depends on Wh, not peak output
- Also covers: home sauna installation
- Also covers: infrared sauna assembly
- Also covers: sauna electrical requirements
- Compare price-per-Wh across models to find the best value for your budget